How to make Christmas ornaments with wrapping paper?
Introduction to DIY Christmas Ornaments The holiday season is a time for creativity and joy, especially when it comes to decorating your home. What better way to add a personal touch than by making your own Christmas ornaments? Crafting with family can bring everyone together, creating cherished memories that last long after the decorations come down.
Using wrapping paper as your primary material opens up endless possibilities. Not only does it allow you to recycle materials you may already have on hand, but it also adds color and texture that store-bought ornaments simply can’t match. Whether you’re aiming for elegant or quirky designs, getting crafty with wrapping paper brings out the festive spirit in everyone.
So grab those leftover rolls of festive wrap and let’s dive into how to transform them into beautiful Christmas ornaments!
Benefits of Using Wrapping Paper
Using wrapping paper for Christmas ornaments is both creative and practical. It allows you to repurpose materials that might otherwise be discarded after the gift-giving season.
The variety of colors, patterns, and textures in wrapping paper opens up endless design possibilities. You can easily find styles that match your holiday theme, from traditional reds and greens to more modern metallics or whimsical prints.
Another benefit is cost-effectiveness. Instead of investing in expensive craft supplies, using leftover wrapping paper saves money while still allowing for beautiful results.
Moreover, crafting together with family or friends becomes an enjoyable bonding experience. As you cut and create unique ornaments, stories are shared and memories made—adding a personal touch to every decoration hung on the tree.
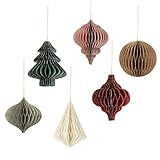
- HANGING PAPER HONEYCOMB ORNAMENT - This beautiful party set can attract...
- SUPER DURABLE AND REUSABLE - Made with durable paper that won't tear when...
- UNIQUE DESIGNS - Glitter edges make the honeycomb decoration more dazzling....
- EASY TO ASSEMBLE - We choose a high-grade magnet. Unfold the honeycomb ball...
- OCCASION - It will perfect for your Christmas, New Year's party, frozen...

- Paper Honeycomb Decoration:You will receive 20 pieces Christmas honeycomb...
- Quality Material:These Christmas tree paper honeycomb ornaments are made of...
- Exquisite Design:The vintage holiday paper ornaments design combined with...
- Easy To Assemble:These Christmas honeycomb hanging decor are convenient to...
- Wide Application:These Christmas paper honeycomb are ideal for your...

- Rich in Quantity: the package contains 12 pieces of paper honeycomb...
- Lasting to Use: the honeycomb ornament is made of thick paper that will not...
- Stylish Design: these paper Christmas ornaments are characterized in...
- Simple to Assemble: just open and stick honeycomb christmas ornament...
- Versatile Applications: coming with exquisite appearance and fine...

- Perfect Additions to Christmas Tree: The honeycomb paper lantern...
- Unique Design: 6 irregular 3D honeycomb shapes, plus glitter gold edge...
- Quality Material: These Christmas paper hanging ornaments are made of...
- Easy to Use: The decorative ornaments have built-in magnets and can be...
- Wide Application: The honeycomb balls are great for Christmas tree Décor,...

- WINTER WONDERLAND: Celebrate in style with our modern take on honeycomb...
- EASY ASSEMBLY: Thanks to the hidden magnetic closure, the paper trees can...
- REUSABLE: Made of sturdy paper, these winter table decorations can be...
- UNIQUE, VERSATILE DECOR: Our honeycomb trees are the perfect complement to...
- HIGH QUALITY: Buy with confidence - LampLust Accordian Paper Decorations...
Materials Needed
To create stunning Christmas ornaments with wrapping paper, gather a few essential materials. Start with colorful wrapping paper. Choose patterns and colors that resonate with your holiday theme.
Next, grab some sturdy scissors. A good pair will help you cut the paper into desired shapes effortlessly. You’ll also need glue or double-sided tape to secure the pieces together.
Don’t forget string or ribbon for hanging your creations on the tree. This adds a charming touch to each ornament.
If you want extra flair, consider embellishments like glitter, sequins, or stickers. These can transform simple designs into eye-catching decorations.
Have a pencil handy for tracing shapes if needed. With these materials gathered, you’re ready to dive into crafting beautiful ornaments that will enhance your festive atmosphere! How to make Christmas ornaments with wrapping paper?
Step-by-Step Guide to Making Christmas Ornaments with Wrapping Paper
Start by gathering your materials. You’ll need colorful wrapping paper, scissors, glue, and a hole punch. A ribbon or string will help you hang your creations.
Cut the wrapping paper into desired shapes — circles, stars, or even hearts. The size is up to you; just keep them manageable for hanging on a tree.
Next, fold each shape neatly in half. This adds dimension and makes them more eye-catching when hung.
Apply glue along the edges of one side before placing another cut-out shape on top. Press firmly to secure it but leave an opening at one end for stuffing if you’d like added texture with tissue or glitter.
Once dry, use a hole punch to create an opening at the top for your ribbon or string. Thread through and tie securely so they’re ready to adorn your tree!
Creative Ideas for Different Types of Ornaments
Transform standard wrapping paper into delightful ornaments by exploring various creative shapes.
Try making stars from folded paper and add a touch of glitter for sparkle. A simple five-pointed star is easy to assemble and looks stunning on any tree.
Consider creating 3D baubles. Cut circles, stack them, and glue along the edges to create dimension. These can hang beautifully in clusters.
For a rustic charm, roll strips of wrapping paper into cones and decorate with twine or small pinecones. They offer a unique texture that complements traditional decorations well.
Don’t overlook personalized photo ornaments! Use your favorite holiday snapshots printed on wrapping paper as the base, adding festive touches around the edges.
Experimenting with different patterns can yield surprising results. Stripes combined with polka dots can create an eye-catching effect that adds vibrancy to your decor scheme.
Tips and Tricks for a Successful Ornament-Making Experience
Start by setting up a dedicated workspace. A clear, organized area will help you focus and enjoy the process without distractions.
Choose your wrapping paper wisely. Look for patterns and colors that resonate with your holiday theme. Vintage papers can add charm, while bright designs can bring energy to your decor.
Use double-sided tape instead of glue for a cleaner finish. This makes it easier to reposition elements if needed and avoids messy spills.
Incorporate various materials like ribbons, buttons, or glitter to elevate your ornaments’ appearance. Layering textures adds depth and visual interest.
Don’t forget about personalization! Add names or dates using markers or stickers. These small touches make each ornament memorable.
Invite friends or family to join in on the fun. Crafting together fosters creativity and creates cherished memories during this festive season.
Conclusion: Why Wrapping Paper Ornaments are the Perfect Addition to Your Holiday Decorations
Wrapping paper ornaments bring a unique charm to your holiday decorations. Their vibrant colors and festive patterns can instantly elevate the look of your tree or home. Plus, they offer a wonderful opportunity for creativity.
Crafting these ornaments allows you to personalize your decor in ways that store-bought items simply can’t match. Each ornament tells a story—whether it’s made from leftover gift wrap from cherished presents or features designs that reflect your family’s style.
Not only are wrapping paper ornaments budget-friendly, but they also encourage family bonding during the crafting process. Imagine gathering around with loved ones, sharing laughter while creating something beautiful together.
With so many variations possible—from simple shapes to intricate designs—the possibilities are endless. You’ll find joy not just in hanging them on the tree but also in knowing that each piece was made with love and care.
Embracing this DIY approach will leave you with memorable keepsakes year after year, making wrapping paper ornaments an essential addition to any holiday celebration.
How to make Christmas ornaments with wrapping paper?
Making Christmas ornaments with wrapping paper is a fun, easy, and inexpensive way to add a personalized touch to your holiday décor. Here are a few creative ideas to help you turn wrapping paper into beautiful ornaments for your tree.
1. Wrapping Paper Ornaments: Simple Round Balls
These are simple, classic ornaments that can be made in a few easy steps.
Materials Needed:
- Wrapping paper (preferably a pattern you love)
- Scissors
- Craft glue or tape
- Ribbon or string for hanging
- A round object to trace (like a cup or lid)
- A pencil
- How to make Christmas ornaments with wrapping paper?
Instructions:
- Cut the Paper: Using your round object (like a cup), trace circles on the back of the wrapping paper. Cut out 6-8 circles, depending on the size of the ornament you want to make.
- Form the Ornament Shape: Start folding the edges of each circle slightly inward toward the center to create a 3D effect. Layer the circles in a way that each layer is slightly smaller than the last. Apply glue or tape in between each layer to secure them together.
- Add a Hook: Once your ornament is assembled, punch a small hole at the top of the ornament. Thread a ribbon or string through the hole to create a loop for hanging.
- Decorate (Optional): You can add a glittery border, paint accents, or even small embellishments like beads or sequins to make the ornament even more festive.
2. Wrapping Paper Stars
Make decorative stars that can be hung on your tree or around your home.
Materials Needed:
- Wrapping paper (in your favorite holiday patterns)
- Scissors
- Hot glue gun or craft glue
- Ribbon or string for hanging
- How to make Christmas ornaments with wrapping paper?
Instructions:
- Cut the Paper into Strips: Cut your wrapping paper into strips that are about 1 inch wide and 6-8 inches long (you can adjust the length depending on how large you want your stars).
- Form Star Shapes: Take five strips and form a star shape by arranging them into a star (with the ends meeting at each point). You may need to trim the ends so they align nicely.
- Glue the Strips: Once you have the star shape, glue the ends of the strips together where they overlap. Let it dry completely.
- Add a Hanging Ribbon: Once the star is dry, glue a small piece of ribbon at the top to create a loop for hanging. You can add extra details like glitter or sequins for some sparkle.
3. Wrapping Paper Cone Ornaments
These conical ornaments can add a fun, whimsical look to your tree.
Materials Needed:
- Wrapping paper
- Scissors
- Tape or glue
- Ribbon or string for hanging
- Decorative elements (optional, like beads, glitter, or buttons)
- How to make Christmas ornaments with wrapping paper?
Instructions:
- Make a Cone Shape: Cut a triangle of wrapping paper. The size will depend on how big you want your cone to be.
- Form the Cone: Roll the triangle of wrapping paper into a cone shape and secure it with tape or glue.
- Decorate the Cone: Add beads, glitter, or any small embellishments to the outside of the cone to make it look festive.
- Add a Hanging Ribbon: Attach a piece of ribbon to the tip of the cone, creating a loop for hanging. You can glue the ribbon in place.
4. Wrapping Paper Gift Box Ornaments
Small, wrapped gift boxes can make adorable tree ornaments.
Materials Needed:
- Wrapping paper
- Scissors
- Small boxes (like empty matchboxes or small gift boxes)
- Ribbon or string for hanging
- Glue or tape
- Tiny embellishments (optional, like tiny bows, buttons, or glitter)
Instructions:
- Wrap Small Boxes: Find small boxes that can fit on your tree. Wrap each box in wrapping paper like you would for a present. If you’re using matchboxes, you can just wrap the outside.
- Secure the Box: Use glue or tape to hold the wrapping paper in place.
- Decorate the Box: Add small embellishments like tiny bows, sequins, or beads to make the box look more festive.
- Add a Hanging Ribbon: Attach a small piece of ribbon or string to the top of the box to make a loop for hanging.
5. Wrapping Paper Wreath Ornaments
Create miniature wreaths that look beautiful on your tree or as part of a holiday display.
Materials Needed:
- Wrapping paper
- Scissors
- Glue
- A circular base (such as a ring of cardboard or a pre-made wire wreath form)
- Decorative elements (like ribbons, beads, or small buttons)
- Ribbon for hanging
Instructions:
- Cut Paper Strips: Cut the wrapping paper into small strips, about 1-2 inches wide.
- Make the Wreath Base: If you’re using a cardboard circle, cut a ring out of a piece of cardboard. Alternatively, you can use a small wire wreath form as the base.
- Wrap the Paper: Start gluing the wrapping paper strips around the ring in a circular motion, overlapping each strip slightly to give the appearance of a wreath.
- Decorate: Add small embellishments like mini bows, beads, or buttons to make your wreath more festive.
- Add a Ribbon for Hanging: Attach a ribbon loop at the top to hang the wreath on your tree.
6. Wrapping Paper Snowflakes
Make beautiful, delicate snowflakes out of wrapping paper.
Materials Needed:
- Wrapping paper
- Scissors
- Glue
- String for hanging (optional)
Instructions:
- Cut Circles: Cut out circles from your wrapping paper.
- Fold the Circles: Fold the circles in half, then in half again, and repeat a few more times, so you have a small triangular shape.
- Snip the Snowflake Design: Cut small shapes or notches along the edges of the folded circle. Unfold to reveal a beautiful snowflake pattern.
- Add a Ribbon for Hanging: If you’d like to hang the snowflakes, glue a small piece of string or ribbon to the top.
Additional Tips:
- Double-sided wrapping paper: If you use double-sided wrapping paper, your ornaments will look beautiful from all angles.
- Add Glitter or Embellishments: Adding glitter, sequins, buttons, or small rhinestones can make your wrapping paper ornaments sparkle and stand out.
- Use Old or Leftover Wrapping Paper: This is a great way to recycle leftover wrapping paper from past holiday gifts.
These DIY wrapping paper ornaments are a great way to get creative and make unique decorations for your tree, while also reusing materials you may already have at home.
How to make Christmas ornaments with wrapping paper?